The Importance of the Scout
There is, perhaps, no individual more responsible to the success of a crop than the lonely scout. No one is certainly in a better position to save a company money. This should be of even greater interest if the company, the grower and the scout are one.
Nearly all major infestations begin with just one or two individual pests. They mate, lay eggs, then, before you know what hit you, your operation is grossly infested. Catching the one or two individuals early, before they have relations, can save you from having to deal with massive numbers, and the resultant associated losses, down the road.
Scouting, as a word, speaks little of what it entails. It is, however, the label put on a methodical, intensive process. Without having it spelled out to a degree, though, many growers are unsure of what the process is, specifically, and tend to poke around the operation in a haphazard, irregular fashion whenever there is time. This is not effective scouting, though it can’t hurt to give a look-see now and then. But there is a better way.
What follows is my recommendations for setting up and using an effective scouting program that will not only provide early insights, but will offer a significant amount of historical information; data which can be used later.
Oh, by the way, scouting is something which should be performed by all growers, regardless of their pest control methodology. It is not just for those growing under the auspices of the Green Methods.
The Green Methods’ Recommended Scouting Program
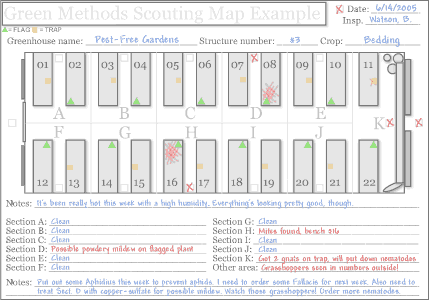
- Measure your greenhouse, planting area, field, etc., and draw a scale-size (i.e. 1/8" = 1 foot) map of the area. See an example below. For the purposes of this example, a greenhouse will be used. Indicate on the map the name, number or location of the structure, in addition to its usable size in square feet and other information which is unlikely to change. Include blanks for weekly information such as crop, inspector, date, etc.
- In the drawing, detail all permanent structures such as greenhouse benches, etc. (You may want to number the benches.) Include non-production areas, as well. For example, a potting bench should be shown (but probably blocked out or shaded since it will not be part of the usefulness of the map).
- Divide and identify the production areas of the greenhouse into 250 sq. ft. sections. (Larger structures and fields of 10,000 sq. ft and above should use 1,000 sq. ft. areas unless there is huge diversity in the plants grown there.) Now you’re ready to photocopy the map onto white paper. Use one copy each week as a guide to your regimen.
- Now that you have a guide for scheduled and organized scouting, it’s time to put it to use. First you’ll want to make a scheduled time for scouting. Try for one day during the week, say Tuesday or Wednesday, at the same time every week, perhaps from 10:00 am – 11:00 am. (Scouting early in the week allows one sufficient time to process the data and order biocontrols, if that is their preferred method of pest control. Biocontrols aren’t pulled from a shelf and must be ordered by set times during the week for shipment the following week. Scouting late in the week may lead to unnecessary delays.) This is a good example time, the area’s well lit, warm, and most pests should be fairly active, with exception to nocturnal feeder such as slugs and the like. Now you’ll want to make sure you get in there to scout on the assigned day, during the assigned time. Fluctuations will cause misreadings and foul your record-keeping.
- Following your map, tour the greenhouse in an organized fashion; proceed from the entrance to Section A, check the 1 or 2 sticky trap(s) in that 250/1,000 sq. ft. section, check the tagged “indicator plant(s),” which should be representative of the plant material(s) in that section, from top to bottom and back up again. Jot down your findings (pests, diseases, controls used, etc.), then move to Section B and continue.
- Graph your findings by date, file the map, and get a very real picture of the pest and disease activity in that section for use later. Proper records will give a very clear look at your operation’s activities.
Valuable Reminders
Don’t forget…
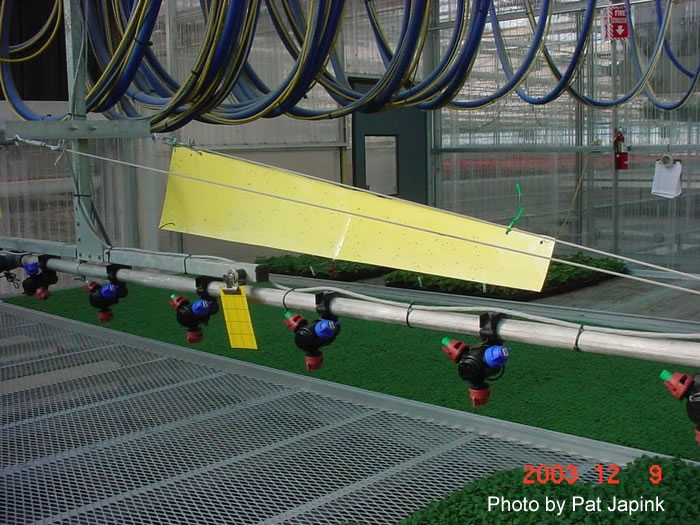
- Use one trap per 250 or 1,000 sq. ft. section, mounted vertically, 2-3" above the plant canopy.
- Use one additional trap per 250 sq. ft. section, mounted horizontally very close to the medium to detect fungus gnats, etc. (Or use a ¼-inch slice of raw potato place directly on the medium to capture larvae. Change the slices weekly.)
- When doing your plant inspections, try shaking the plant over the back of the white scouting map; this will help you greatly in finding pests like thrips.
- Don’t lighten up with the regimen: miss 1 day and you’ll taint two weeks worth of records (instead of two 7 day weeks, you’ll end up with one 6 day week and one 8 day week).
- Change your traps if they have such a number of pests that it will make counting difficult or inaccurate the following week. If few pests are recorded, circle said pests with an old ball-point pen so they aren’t counted again the following week. Change the traps once a month even if they are clean so as to be sure the sticky compound remains viscous and functional.
…because this stuff’s important.
What’s on your Traps?
The information below might help you identify some of the more important bugs you’ll capture using yellow sticky traps.
- Aphids
- Normally, only winged aphids will be caught on sticky traps. In most cases, the aphid’s wings will settle to either side of its abdomen. Often, the aphid will bear young before dying. The brood, which will be barely visible, will also be trapped. An aphid’s front wings have two parallel veins close to the wing’s leading edge. The legs and antennae are long and thin. Another distinguishing characteristic is the presence of siphoons (two hornlike appendages at the rear of the aphid).
- Fungus gnats
- More often than not, fungus gnats will be in a multitude of positions because they struggle to free themselves, These small, fragile gray/black insects are mosquito-like,but smaller. They have a distinctive Y-shaped vein close to the outboard edge of each wing (the stem of the “Y” will point towards the body). The legs are very long and thin. The much segmented antennae are also very long and thin, and appear beaded.
- Leafminers
- These pests are small flies and look accordingly. Like fungus gnats, leafminers will thrash about on the sticky trap and become even more mired. They have medium-length legs and short antennae. Another important identifier is a yellow spot on each side of the thorax.
- Shore flies
- These too, as their name implies, look like flies. They are about the size of fruit flies, but are much darker and have black eyes. They have pale spots on their winders, medium-long legs and short antennae.
- Thrips
- These barely discernible insects have long, thin bodies. Their wings, which will usually be closed tightly to the body, are fringed with tiny hairs. The legs will not be visible, and the stubby, thick antennae will protrude from the head to form a “V” shape.
- Whiteflies
- These tiny, fragile flies are normally covered with a white, powdery bloom. When caught in a sticky trap, any of this white coating which contacts the adhesive usually dissolves into the morass, making visible their true color: dull orange. However, body parts which do not contact the adhesive will remain white. Their legs and antennae are medium-short. The whitefly is the easiest pest to identify on yellow sticky traps.
- Other
- If these traps are used outdoors or in an open-system greenhouse — especially one not on a spray regimen — hundreds of different species will be caught on sticky traps. Most of which will be of no concern to anyone. Many will be beneficial to agriculture. If large numbers of a single species appear on your traps, have it checked out. Contact us right away, consult one of our recommended books or notify your cooperative extension entomologist.
If you find you still need help, you can also contact us. Maybe we can help.